A Chicken in Every Crockpot!

Karen's Kitchen Adventures

Nutella Molten Lava Cakes August 22, 2010

Filed under: baking,dessert — frappqueen @ 6:13 pm
Tags:

Just looking at that picture makes you want to give it a try, doesn’t it? Well, if that isn’t enough encouragement, guess what? They were really easy to make and not at all scary! A few weeks ago Jen came over and we watched the first airing of Masterchef…remember how we auditioned and never got any further than that? Well, we had a party to watch what we didn’t get  to be on. Jen made amazing beef wellington (to be blogged next time) and I made these for dessert! Mike got to benefit from the party by eating everything and putting the dishes in the dishwasher!

I got this one through a google search, and the blogger who wrote it I think made up the recipe, which is pretty impressive. I could never really be on any of these shows for that reason…I can improvise like, a tad, but not enough that if you just told me to make something I could do it. But anyway, here is the recipe and then my own notes on what I had to do to make it work for me!

Chocolate Nutella Molten Lava Cake (courtesy of bellalimento.com)

6 oz of bittersweet Chocolate Chips (I used Ghiardelli)
4 tbsp of Nutella
6 tbsp of Flour
11 tbsp of Unsalted Butter (I used salted cuz its what I had)
3 whole eggs + 3 additional egg yolks
1/4 cup of sugar + 2 add. tbsp
1/4 cup of chopped Hazelnuts ( I toasted mine for a few minutes on a tray in the toaster oven–delicious!)

Method:

Place your butter & chocolate chips into a double boiler & allow to melt completely over the steaming water.  (I don’t really know if a double boiler is an actual thing, but I just put on a big pot with some almost boiling water and then put a glass bowl fitted over it, added the chocolate and stirred–worked like a charm!) Stir frequently. WHILE the chocolate butter is melting. Place the eggs & sugar into the bowl of your mixer. With the whisk attachment mix on medium-high speed until they become light & thick (about 8-9 mins). When light & thick add the flour & mix together. SLOWLY & GRADUALLY pour the chocolate/butter mixture into the egg mixture. Mixing on low until well combined & develops a glossy sheen (about 5-6 mins).

Preheat your oven to 350 degrees. WHILE the mixture is finishing it’s final mixing (turning glossy) GENEROUSLY spray 4 small ramekins with cooking spray. If your ramekins are for some reason insanely small, like mine, you might need more than four.  Just sayin’.  When the batter is finished it’s time to assemble:

Place your sprayed ramekins onto a cooking tray. Ladle batter HALFWAY up the side of each ramekin. Then, spoon 1 tbsp of Nutella into each ramekin. Finish ladling remainder of batter into each ramekin (do not overfill). Bake ramekins for 1o-14 mins until outside is solid and top appears to be soft (but NOT jiggly)

WHILE cakes are cooking, chop your walnuts and spread on a small tray that fits in your toaster oven or regular oven. Bake at 300 degrees for like 3 mins. WATCH THEM OR THEY WILL BURN AND BE NASTY.  When nuts look a tad brown, they are ready to take out of the toaster/oven. When cakes are ready CAREFULLY remove them from oven, place a plate on top of each one and quickly invert it. With a kitchen towel remove the ramekin, cake should fall right out.  Loosen all around with a knife if they don’t come out easily. Garnish with nuts. Serve immediately and wash down with a big glass of milk. It’s the only way. Really.


Minted Watermelon and Lemon Ice Pops! July 30, 2010

Filed under: dessert — frappqueen @ 11:15 am
Tags: ,

Oh man, these ice pops take some time to prepare (well, you have to wait for stuff to cool and set up, so it takes a few hours of waiting, but not too much time of actual WORK), but holy moly, they are worth every second of it! The last time I made them, Mike and I ate all 10 in about three days! We couldn’t help ourselves! They are so full of flavor and deliciousness, you can not control yourself! Besides, they came out of the June 2010 issue of Cooking Light magazine, and are made with real fruit, so seriously, how bad can they be for you? right?! …right???

Minted Watermelon and Lemon Ice Pops

Watermelon layer:
1/4  cup  sugar
1/4  cup  water
1/4  cup  coarsely chopped fresh mint
2  cups  packed (1/2-inch) cubed seeded watermelon
1  tablespoon  fresh lime juice

Lemon layer:
6  tablespoons  sugar
1/2  cup  water
2/3  cup  fresh lemon juice
1/3  cup  fresh orange juice
1/4  teaspoon  orange extract

Method:

To prepare watermelon layer, combine 1/4 cup sugar and 1/4 cup water in a small saucepan over medium-high heat. Bring to a boil; cook 30 seconds, stirring until sugar dissolves. Stir in mint; cover and let stand 30 minutes. IMPORTANT: Do not mis-read this as let stand 30 SECONDS as I did the first time…that results in still delicious pops, but a total waste of the mint that you spent all morning hunting down!

Strain through a sieve into a bowl. (I just picked out the mint, how many friggin sieves do these people think I own?!)

Place watermelon in a blender; process until smooth. Strain puree through a sieve into bowl with mint syrup; press with back of a spoon to extract juice. Discard solids. Stir in lime juice; cover and chill 1 hour.

Pour about 2 1/2 tablespoons watermelon mixture into each of 8 ice pop molds. Freeze 1 1/2 hours or until almost set. Arrange 1 wooden stick into mixture, being careful not to push through to bottom of mold. Return to freezer. Freeze 1 hour or until frozen.

To prepare lemon layer, combine 6 tablespoons sugar and 1/2 cup water in a small saucepan over medium-high heat. Bring to a boil; cook 30 seconds, stirring until sugar dissolves. Pour into a bowl; stir in lemon juice, orange juice, and extract. Cool 15 minutes; cover and chill at least 1 hour.

Remove molds from freezer. Pour about 3 tablespoons lemon mixture over frozen watermelon mixture in each mold. Freeze 2 hours or until completely frozen.

Note: If you have those really cool popsicle sets from like the 80’s where the sticks are part of the lid and you don’t think you can add the sticks and then take them out to make layers, I say no worries…just swirl both bowls together and pour them in! You will just have some nice watermelony/lemon pops instead of a layer of each flavor!


“Master Chef” Espresso Creme Brulee January 9, 2010

Filed under: dessert — frappqueen @ 11:03 pm
Tags:

Oh my! My dish is finally done and ready for inspection tomorrow! As you hopefully read in my previous entry, tomorrow I’m auditioning for the FOX reality show Master Chef!! I do not really think I will be on it, but I am pleased to say that I DO think my dish came out amazing!

I was not sure what to prepare at first. They say to come with a prepared dish that can be served at room temperature. It is open casting, so you wait in a long line most likely for hours. So, what to prepare seemed daunting.

I LOVE making risotto and I know that Gordon Ramsey loves a good risotto, but the problem with that was serving it. It’s no good once it cools down, it becomes gluey and gross. Besides, this is purely for fun, so why stress myself out over it? And of course, I can’t serve something that I KNOW is no good! So, the idea of dessert became more appealing. It is really my favorite thing to cook and of course it can be served at room temperature usually…but it had to be impressive!

Finally, I found a great recipe for low-fat espresso crème brûlée! Winner! As I was shopping for the ingredients though I realized it was silly to try a brand new recipe that was low fat on judges of a cooking contest. They do not care if it is good for you, they only care about taste. Besides, the recipe called for dry milk and they only sell it by the crate-load! So, I opted to sort of meld two recipes together using real heavy cream like a good pastry chef would, and then added a bit of my own invention. The result? Amazing if I do say so myself!

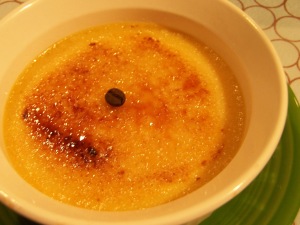
ooh la la!

I must say, preparing them was NOT one of my easier projects. It took a LONG time. The eggs were being crazy and cracking lengthwise! I had never seen anything like it! I ended up adding a fifth egg yolk as mine seemed small and I was afraid it would not be custardy enough. Then as I was preparing it and tasting it, it didn’t taste like espresso enough to me. That’s when I thought quickly and brewed a cup of Kona on my Keurig and tossed some in. Success!

Here is what I did:

Master Chef Espresso Creme Brulee

1 extra-large egg

4 extra-large egg yolks

1 cup espresso beans

1/2 cup sugar, plus 1 tablespoon for each serving

3 cups heavy cream

1 teaspoon pure vanilla extract

5 tablespoons bold brewed coffee (I used Kona)

Method:

Preheat the oven to 300 degrees F.

In your electric mixer using the paddle attachment, mix the egg, egg yolks, and 1/2 cup of the sugar together on low speed until just combined. Meanwhile, heat the cream in a small saucepan with the vanilla and espresso beans until it’s very hot to the touch but not boiled, if you have a thermometer it should be about 180 degrees. Remove from heat and cover with a lid. Let the cream steep with the espresso for about a half hour…longer if you want more of an espresso taste, but not so long it cools down. Strain the liquid into a measuring cup or bowl. With the mixer on low speed, slowly add the cream to the eggs. Add the brewed coffee and give the liquid a taste. Adjust it as you see fit! You do not want it to taste excessively of coffee; more like a cup with much cream and sugar added. Using a ladle or measuring cup, pour the liquid evenly into four or five ramekins, but do not fill all the way to the top.

Place the ramekins in a baking pan and carefully pour boiling water into the pan to come halfway up the sides of the ramekins. or at least 1 inch.  Bake for 35 to 40 minutes, until the custards are set when gently shaken. Mine took about 40 minutes. Remove the custards from the water bath, cool to room temperature, and refrigerate until firm. I must confess, we could NOT wait and ate ours at room temperature and they were still amazing!

Now comes the fun part! spread 1 tablespoon of sugar evenly on the top of each ramekin and heat with a kitchen blowtorch until the sugar carmelizes evenly. Allow to sit at room temperature for a minute until the caramelized sugar hardens. Pick up your spoon a la Amelie, and crack into that sugary crust! Enjoy!

*This recipe was adapted from a combination of recipes found on Foodnetwork.com and CookingLight.com! Though I must confess, I added the coffee all on my own 🙂