A Chicken in Every Crockpot!

Karen's Kitchen Adventures

Buttermilk Cranberry Scones November 17, 2010

Filed under: baking,breads,breakfast — frappqueen @ 4:59 pm
Tags: , ,

I don’t have much experience making scones, aside from the really delicious ones courtesy of Nurse Liz, but those are easy as they take cream and not incorporating bits of butter. BUT! I was in the mood and I’d had this recipe bookmarked in my internet browser for like a zillion years so I figured, why not give it a try? I have to say, it was really simple to do and the results were delicious! I only changed the recipe slightly in that I added orange zest instead of lemon zest since that’s what I had at home, but things like that are relatively interchangeable anyway. Citrus always makes things better in my opinion!  Give them a try! They come out light yet kind of flaky and not too sweet, just the way scones ought to be in my opinon!

Buttermilk Cranberry Scones

2 cups all purpose flour
1/4 cup granulated sugar
1 1/2 teaspoons baking powder
1/4 teaspoon baking soda
1/2 teaspoon salt
1/2 cup cold unsalted butter, cut into small chunks
1/2 cup buttermilk
1 large egg
1/3 cup sweetened dried cranberries, chopped fine  I added a bit more as I like a lot of stuff in my scones)
finely grated zest from one small lemon (about 2 teaspoons) (you can use zest from an orange too!)
heavy cream (optional, for brushing tops of scones)

Method:

Preheat oven to 425 degrees.

In a medium bowl, whisk or sift together flour, sugar, baking powder, soda and salt.  Add butter chunks and toss lightly with flour; place bowl in fridge.

In a small bowl, whisk together egg, buttermilk, and lemon zest; place bowl in fridge.  Measure out and chop the cranberries; set aside. Line a baking sheet with parchment or lightly spray with cooking spray; set aside. Lightly dust a counter top with flour.  Pour a little bit of heavy cream in a bowl and have a pastry brush handy.
Remove bowls of flour and buttermilk from fridge.  Cut butter into flour with a pastry blender or rub together with your fingertips until it resembles coarse crumbs. Add cranberries and stir to combine.   Add buttermilk mixture all at once to flour mixture and stir until the mixture clumps together.
Dump mixture out onto floured counter top and, with floured hands, gather into a ball and knead once or twice to combine everything.  Pat into a circle about 1/2 inch thick.  Cut into 8 slices, like a pie, or cut with biscuit or cookie cutters into whatever shape you prefer.  Put scones on lined baking sheet and brush lightly with heavy cream (optional).
Bake in a preheated 425 degree oven for 13-15 minutes until lightly browned.  Remove to cooling rack. Try not to eat them all in one sitting!!
 

Zucchini Bread! July 29, 2010

Filed under: baking,breads,eat your vegetables — frappqueen @ 8:16 am
Tags: ,

Man, who knew blogging could be so difficult?! I had taken a few pictures with my awful point and shoot camera last week, and when, in my sleepy pregnant haze, I went to insert the memory card into my computer, I MISSED and put it in the cd spot instead! It has been trapped there for the past week, but finally, with the help of tiny tweezers and a screwdriver, my husband has rescued the memory card! yay!

Now you can see my delicious recipe for zucchini bread. It is really easy to make, particularly if you have a food processor with a shredding blade. It is also super delicious and filling. Yum!

This recipe actually comes from good ol’ Paula Deen on the foodnetwork.com website. It has great restraint for Paula, I don’t think it has any butter in it, though there is definitely some oil!

Zucchini Bread

3 1/4 cups all-purpose flour
1 1/2 teaspoons salt
1 teaspoon ground nutmeg
2 teaspoons baking soda
1 teaspoon ground cinnamon
3 cups sugar
1 cup vegetable oil
4 eggs, beaten
1/3 cup water
2 cups grated zucchini**
1 teaspoon lemon juice
1 cup chopped walnuts or pecans

Method:

Preheat oven to 350 degrees F. In a large bowl, combine flour, salt, nutmeg, baking soda, cinnamon and sugar. In a separate bowl, combine oil, eggs, water, zucchini and lemon juice. Mix wet ingredients into dry, add nuts and fold in. Bake in 2 standard loaf pans, sprayed with nonstick spray, for 1 hour, or until a tester comes out clean. Alternately, bake in 5 mini loaf pans for about 45 minutes.

**to grate the zucchini, you can totally break your back and fingers and use one of those hand held grater things, but I always scrub my knuckles on them. I just chop my zucchini up into like 4 wedges, add the grating attachment to my food processor, and plop the zucchini in there! Done in seconds!


Blubbery Muffins!! June 6, 2010

Filed under: baking,breads,breakfast — frappqueen @ 10:54 am
Tags: , , ,

Okay, so they are Blueberry muffins, but Mike and I have a secret: we really really like the kid’s tv show ICarly. I know, its a show for 8 year olds, but have you seen it? It is hysterical! At any rate, one episode they get lots of cash for selling faulty sneakers and Sam hires a chef who makes Blueberry Muffins for her everyday, but calls them Blubbery, cuz she has an accent and…okay, well, maybe you had to be there, but whatever, that’s what we call them now too!!

In my 10th week of pregnancy or so (I’m almost up to week 17, whoo hoo!) I began craving, NEEDING blueberry muffins. I wanted homemade ones though, not crap from Dunkin Donuts! No sir! Also, I was finally feeling well enough to stomach cooking, so I was in dire need of baking!! I found this recipe via our dear friend Martha S. and it is divine. In fact, I think I have baked them about 4 times since! The muffins taste best the day you make them, but keep decently well in a plastic bag all week. I often bake a batch on Sunday and then eat one every morning around 10am for my second breakfast. I eat every hour these days, what can I say?! Give them a try, they are surprisingly easy, healthy, and awesome!

Blueberry Muffins (from Martha Stewart)

1/2 cup (1 stick) unsalted butter, room temperature, plus more for pan *
2 cups all-purpose flour, plus more for pan
1 1/2 teaspoons baking powder
1/2 teaspoon salt
2 cups fresh blueberries
1 1/4 cups sugar
2 large eggs
2 teaspoons pure vanilla extract
1/2 cup milk
1/4 teaspoon nutmeg

Method:

Preheat oven to 375 degrees. Generously butter a standard 12-cup muffin pan and dust with flour, tapping out excess; set aside*. In a medium bowl, whisk together flour, baking powder, and salt. Working over the bowl, toss blueberries in a fine sieve with about 1 1/2 teaspoons flour mixture to lightly coat; set aside the flour mixture and the blueberries.
In the bowl of an electric mixer fitted with the paddle attachment, or using a handheld mixer, beat butter and 1 cup sugar on medium-high speed until light and fluffy, about 3 minutes. Add eggs, one at a time, beating until combined. Mix in vanilla.

With the mixer on low speed, add reserved flour mixture, beating until just combined. Add milk, beating until just combined. Do not overmix. Using a rubber spatula, fold in the blueberries. Divide batter evenly among the prepared muffin cups. If desired, in a small bowl, mix together remaining 1/4 cup sugar and nutmeg. Sprinkle sugar mixture on top of muffin batter.

Bake, rotating pan halfway though, until muffins are golden brown and a cake tester inserted in the center of one muffin comes out clean, about 30 minutes. Transfer pan to a wire rack to cool 10 minutes. Turn muffins on their sides in their cups, and let cool. Serve warm or at room temperature.

* I am always afraid to just bake stuff right in the muffin tin, so I didn’t. Instead of buttering the tins, I just used good ol’ paper liners. Works every time!


Nurse Liz’s Ham and Cheddar Scones April 23, 2010

Filed under: breads,breakfast,Uncategorized — frappqueen @ 9:00 pm
Tags: ,

These scones are AMAZING. Even if you have always feared scones, please please go and make them! Right now!! I’d always wanted to try to make scones, but a lot of the recipes seem a bit daunting and involve rolling out and cutting stuff just right and I never got around to it yet. However, one lovely day last year, Nurse Liz at school brought in these delectable ham and cheddar scones for someone’s birthday and let me sneak one. Holy moly, I was ready to give scone making a try after that! They are really just that good. Savory and a touch of sweet. Oh. yum. The nice thing about this recipe too is that its a cream scone mixture, meaning not much measuring and zero rolling out! You put it in cake pans to freeze and slice out the triangles to bake. Its easy and you can make them ahead of time and keep them in the freezer til you are ready to eat.

Ham and Cheddar Scones

3 c. all purpose flour

1/2 c. sugar

2 tbsp baking powder

1/2 tsp salt

1 c. medium diced ham

1/2 c. medium diced cheddar cheese (sometimes I use shredded if I forget to get a block o’ cheese)

1/2 c. sliced scallions (green onions)

2 c. heavy cream (if you want to make it lower fat you can do fat free half and half for one of the cups)

Method:

Line a 10 inch round cake pan or two 8 inch round cake pans with a layer of parchment paper. If you are like me and don’t have that…just use a layer of tin foil followed by a layer of wax paper for good measure. Set aside.

Sift the flour, sugar, baking powder and salt into a mixing bowl. Add the ham, cheese and scallions and toss together with the dry ingredients.  Make a well in the center of the mixture.  Add the cream to the flour mixture and stir to just until the batter is evenly distributed. Don’t use a mixer, just use a spoon and some elbow grease.

Place the dough in the cake pan(s) and press into an even layer. Cover with more parchment paper or foil or plastic wrap and freeze until very firm, at least 2 hours. I usually make the night before.

When you are ready to cook them, preheat the oven to 350. Spray a baking sheet with cooking spray. Thaw the dough on the counter for about 5 minutes until it is able to move and be cut into while still being stiff and cold. Cut the dough into equal wedges and place them on the baking sheet with room between them, about 2 inches apart.

Bake at 350 until golden brown, about 30 or 40 minutes. Cool on the baking sheet a few minutes before transferring them to a cooling rack. Serve warm or at room temperature. Best when eaten the same day they are baked…refrigerate or freeze the leftovers. Really though, you won’t have leftovers as you will eat one to see if it is good, one for a snack, two for brunch, one for an afternoon snack and then one because, well, it looked so LONELY on the plate!


Focaccia from Scratch! February 27, 2010

Filed under: breads — frappqueen @ 11:46 am
Tags:

After making pizza last week and reading all about the adventures of a baker, I really wanted to try making yeast doughs by hand. Usually when I want bread I just toss it all in the bread machine and enjoy the delicious smell and wait for it to beep, but I must say, making bread by hand is really quite fun and soothing! Who knew?

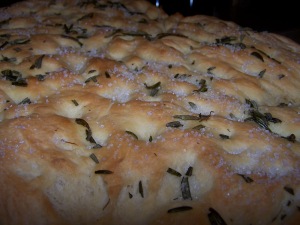
We had a mega snowfall yesterday and as a result, I was not going anywhere! So I figured trying to make Focaccia was as good a plan as any. This recipe comes from that awesome book I recently read, Confections of a Closet Master Baker. She says you can use the basic dough to make rolls or pizza as well as the focaccia. The recipe I made is for a basic rosemary focaccia but you can add any other topping you like…sun dried tomatoes, carmelized onions, whatever floats yer boat! It was really easy to make and oh man, does it taste good! We ate ours with my famous pasta fagioli and it was fantastic. Soup recipe to come soon, don’t worry!!

focaccia!

Focaccia

one 1/4 oz. package active dry yeast (2 2 1/2 tsp)

5 c. all purpose flour, plus extra for kneading

1/4 c. plus 3 tbsp. extra virgin olive oil plus extra for bowl and pan

2 1/2 tsp table salt

1 tbsp finely chopped fresh rosemary

1 tsp coarse sea salt

Method:

Stir together 1 2/3 c. lukewarm (105 degrees to 115 degrees) water and the yeast in the bowl of an electric mixer and let stand until foamy, five minutes. *Uh, mine didn’t really foam, but I proceeded and it still worked so its probably okay!

Add the flour, 1/4 c. of the oil and table salt and beat with the paddle attachment at medium speed until a dough begins to form. Switch to the dough hook attachment (which was exiting for me as I’ve never used it before!) and knead at low speed until the dough is soft, smooth and sticky…about 3 minutes. DON’T OVERKNEAD!

Lightly oil a large bowl. Turn the dough out onto a lightly floured surface and knead by hand another 1 or 2 tbsp of flour. Knead it for another minute (it should be slightly sticky), and transfer to the bowl. Turn the dough to coat it with the oil in the bowl. Cover with plastic wrap and let it rise in a warm spot in the room until doubled in bulk, about 1 or 1 1/2 hours.

Generously oil a large cookie sheet. Press the dough evenly into the pan, but try not to make indentations at this point or it will not rise again! Cover the pan completely with a damp kitchen towel. Let the dough rise in a warm corner of the room until doubled in bulk, about 1 hour.

While the dough is rising, preheat the oven to 425. Stir together the rosemary and remaining oil. Make shallow indentations all over the dough with your fingertips, then brush with the rosemary oil, letting it pool in the indentations. Sprinkle sea salt evenly over the focaccia and bake in the middle of the oven until golden, 20 to 23 minutes.

Remove from pan and let cool a bit on a rack. You can eat this warm or at room temperature. It’s great dunked into soup!